Sunday, June 22, 2014

Textured Background and Contrast

The meanderings of a Saturday afternoon:


Sometimes the idea for a piece of art comes from whatever surplus items I happen to have around. The other day, as I was cleaning out a closet, I came upon by bag (or, to be more precise, BAGS) of leftover yarn. And so this art project began...

First step was to wrap and tape some yarn to a piece of board.


Next, I painted the whole thing. I used primary colors, but I am thinking that kids could use whatever color theme they like.

Then I unwrapped the yarn, but wasn't all that happy with it because of the lack of contrast. Think I'll give it a try using liquid tempera instead of cake tempera.
However, as it dried I noticed there were some darker areas . . . I thought, "Maybe if I just make them darker." So, out came the crayons.
I find that one of the hardest things to teach elementary students is to "see the darks" and get a full range of value. This might be a good exercise for that.
I chose dark values of crayons and deepened the painted areas that were already a bit dark. Huge improvement!!
Satisfied with the results, I went back to my closet organizing. Right in front was my newest project (which I found through Pinterest here - it's a great tutorial!) -- twisted twine made from fabric scraps (which I have in abundance in another cupboard!!). Maybe fodder for a future post!

This, of course triggered phase two of my little art project -- some lines. At first I made a black and white line and then tried a secondary color line to mimic my twine. I wasn't sure which I liked and left them both sitting there on the background while I continued my closet project. When I came back I started moving the 2 lines around and intertwining them until I found a composition that I liked.


I think this will be a good process for kids at school to reinforce how artists often don't just crank things out at one time, but rather, mull over their options and discover new solutions:)) And now, back to my closet . . . ho-hum . . .

Saturday, June 21, 2014

OOPS!! City Shapes and Sounds - Results

Picture me chuckling -- well, sort of:))
I have just spent the last two hours adding more informative labels to most of the posts in the blog so that specific lessons can be found more easily. Seemed like a good idea when I started. However, somehow this post (from 2011) got re-published with today's date and I can't figure out how to get it back where it belongs!!! The original lesson is here. Oh well, guess I'll just leave it here. Hope everyone is having a great week-end!!

Yeah kindergarteners!!
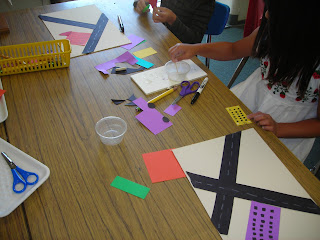
Here are some of the results of this week's work celebrating the art of Stuart Davis.

Preparation was key in this lesson with back to back classes. I had prepared plates for each table with all necessary supplies and swapped out the plates quickly for each new group.

Visual directions were on board for students to follow.
I started the lesson showing the kids slides of 5 city scenes (3 by Stuart Davis) and having them close their eyes and listen to the sound of traffic (from an internet sound effects clip). I asked them how all were alike. That got us thinking and talking about cities. Before starting the collage, we could practice moving the "buildings, words, etc." and talk about placement of the pieces.


Placing the streets was tricky, but the kids really "got it!"


Thursday, June 12, 2014

A Year of Red, White and Blue

Happy Flag Day to you!!
I thought it would be fun to go back over the year and find some red, white and blue images (starting with these Memorial Day flags):
I haven't done this art project at school yet -- maybe next year...
Part of this exercise was like going on vacation again, revisiting fun places. Here is artist, Nic, painting in front of his gallery in Carmel, CA and another view of the Pacific Ocean (also in Carmel).

And then there was visiting Balboa Island, where EVERY house has a cute mailbox out front!!
Here is another art project that I intended to do with the kids this year.
Summers in Victor, Montana have such special memories!!! The 4th of July there is great fun!!
Speaking of Victor, Mt, I got this little kid's antique chair near there years ago. (The Mondrian Art books didn't come with the chair though!)
Last November I got in the mood to paint some needlepoint Christmas ornaments. I used to do a lot of that -- not so much anymore. But it was fun to work on them for a few weeks.
I found this little door ornament at Joann's last week. Getting ready for the 4th, I guess:)
 I've had this little guy for almost my whole adult life. He's always just sittin' there on my desk.
And, finally, one of our favorite art projects for 1st graders...
I think I will spend some time between now and the 4th of July collecting a few more red, white and blue photos. Hopefully I'll be able to find some images near our school so they will be familiar to the students. I can use them for a Smartboard presentation for a red, white and blue art project next year!!

Sunday, June 8, 2014

Goodbye Art Room, Hello Art Cart

After 4 years of having the luxury of teaching in a designated art room, the time has come when I will be transitioning to teaching in the regular classrooms and using an Art Cart to transport all the supplies. The good news is that the reason for this change is a reduction in class size in our primary grades, so that will be great for kids and teachers!!
 No doubt, I will miss this room with its patio and its Smartboard. They are definitely conveniences. However, all the classrooms have Smartboards, so I plan to carry my visuals on my keydrive and quickly download lessons (as needed) to classroom computers. Actually, that should be good for teachers because they will have those Smartboard docs to use as resources for themselves.

So, where am I moving?? Well, to several places!! I have 2 cupboards in the teachers' workroom where there is a sink. I emptied them out a few months ago. They looked like this:
Now they look like this:
I gave away all my acrylic paints (hope I don't regret that move!) and just kept the tempera and watercolors so it all fit, sort of:))

Then I acquired a storage area behind our stage in the Auditorium (up some stairs in back of the "green room.") While not nearly as spacious as a classroom, it turned out to be larger than it looks. My fear was that I wouldn't have room for all those "saved treasures" that teachers acquire and that I would have to throw a lot of stuff away. No worries there -- everything actually fit in these storage areas!! In my hurry to get moved I didn't get any "before" photos, but I finished moving this past week and now it looks like this:

 I was amazed to see how much mat board I had accumulated. This is the board that our local art framing store (L.A. Art Exchange) donates for me to recycle for most of our projects. I just have to make sure that the sharp edges all get trimmed before we use it.  I LOVE that they do this for us!!!
 Part of the reason I took photos was to help me remember where I put everything. I tried to put all the "wet" stuff in the workroom where the sink (and my cart) will be. Everything else is in this upstairs area -- which, by the way is very dimly lit by one overhead light. With the magic of photo editing, these pictures make it look well lit and cheery (well, sort of cheery -- I have plans to make it look more inviting for myself when I get back in the Fall).
 This area has a separate little room that used to be a bathroom. It has a narrow window, so when I open that door I get a little more light for the whole area. It has a couple of old 4-drawer files it it that now house my books and a few more supplies.
This will look better once I hang something on the bare wall, ya think???

 As I moved I made a record of where everything was going in a small composition book. I think I am going to thank myself for taking the time to do this. Otherwise I envisioned hunting for one little item like breyers, or rubber gyotaku fish forever!!


 I tried to move things one cupboard at a time, keeping like things sort of together to help me remember where things are. I also only moved for an hour or two each day to try to preserve my back. It took longer, but I never really got tired from the effort and before I knew it, I was moved.


Years ago a student gave me this wall hanging -- I moved it with me and hung it in this area to give me a little feel of familiar surroundings in my new digs:))

One last thing...  Back when I found out this was all happening, I Googled "Art on a Cart" and found that Mrs. C at Rainbow Skies and Dragonflies, a fellow blogger whom I follow, had posted this great article called "Surviving Art on a Cart" (see here). She has some terrific tips for those of us in this situation and kindly wrote and offered me encouragement. Thank you again for that!!! Believe me, I have been saving containers with lids and plastic shopping bags with handles!! 

I don't want to have to give up my messy painting projects and am thinking that if I am just organized enough it will all work out and we can continue to create our painted papers, gyotaku prints, etc.  All our classrooms have sinks, so how hard can it be, right..??!!!! Wish me luck -- this will be a new experience!!

Tuesday, June 3, 2014

Art Room Refills

Does this look familiar?? Just wonderin' , as I sit here, how many other teachers are refilling watercolors and restoring order to art cupboards? :))