Showing posts with label Shape. Show all posts

Saturday, August 27, 2016

Oil Pastel Dots for Dot Day - Art Audition #2

With September just around the corner, it's time to start thinking about International Dot Day to celebrate Peter Reynold's book, The Dot. Each year I get engrossed in thinking about all the wonderful possibilities of tying art lessons to this fabulous little gem of a book, and this year is no exception. You can see previous years' lessons here, and here.

The first idea I am auditioning for this year is this simple (and quick) lesson that will introduce oil pastels and pinch-tearing all at the same time.


The supplies are simple: 9 X 12 construction paper pre-cut into fourths, some oil pastels, and a piece of background paper on which to glue the shapes. Pentel is one of my preferred brands because the pastels are soft and easy for students to use with good results.


The first step is to "pinch tear some dots". I would have kids practice this first using scratch paper. You can see a lesson on this by clicking here.


Once students have a few "dots" torn they start coloring areas using either warm or cool colors, using a color wheel as a guide to their thinking and planning.  I like to have them overlap areas of color just a little to see how the colors interact and what new colors appear. Using white to tint some of their colors makes for some nice experimenting, too. You could have students use any color system, not just warm and cool.


I had intended to use just black construction paper, but decided I liked the variety of using lighter colors of paper, too. I also thought about and tested using baby oil and swabs to blend the pastels slightly, but found that that didn't really add value (except, perhaps the lovely clean aroma of the baby oil in a classroom!) to this project. That is one of the advantages of auditioning a lesson first, before using it in the classroom!

The final step is to glue the dots on a background paper (either plain or painted if I want to get a little messier), overlapping edges just slightly.

I am actually thinking about doing this as a collaborative project that will cover a HUGE area, with hundreds of dots!!!

Sunday, May 29, 2016

Stars and Stripes 2016

Whether it is Memorial Day, Veteran's Day or the 4th of July, it is fun to  celebrate the red, white and blue. This is a quick project requiring pastels, paper, paint and a few pieces of cardboard.

Artists use one triangle and chalk to create a five-pointed star. This is good for talk about, not only how you go about positioning the triangle five times to create the star, but also for the starting point of the chalk marks (on the triangle, brushing out) and conversation about the direction you "swipe" the chalk (from the triangle straight out as you work your way around the point of the triangle). It is a good idea to practice this on newspaper first! If you think the triangle method is too hard for you group, this can be done with a full star pattern instead.

After making the initial chalk mark, students swipe the mark again with their finger, smearing the chalk outward, so the star looks like it is shining.
Once the stars are done (I like the kids to make various sizes using small and large triangles), it is time for some stripes.

These were done by dipping the edge of a piece of cardboard (we use scraps of illustration board) in tempera (acrylic works, too) and "printing the stripes". I emphasize, "straight down, straight up" to avoid sideways smears!!


 You can decide whether to have your kids stick with vertical/horizontal stripes like the one above, or let them print however they like, as in the example below.

The motivation for all of this was our local National Veteran's Cemetery (seen across the street from the Federal Building), which is adorned right now with thousands of American flags at the gravesites and along the inner roads. I love driving by this time of year. Hope you all have a meaningful holiday as summer nears!


Saturday, August 29, 2015

Art Rocks!!


How about this for a cool way for kids to practice shading to create the illusion of depth?! You could start by having your class collect their own rocks/pebbles to draw, or you could use a photo of rocks, like this photo of river rocks taken on my vacation in Montana this summer. I ask kids to imagine what it would look like if each of these rocks had a magical patterned stripe (or stripes) around them!


This can be done with any number of rocks appropriate for your age group or time restrictions. It starts with a pencil sketch using a light source to identify shadows. I know I have written about my light source icons, but it bears repeating. Here is a link to that lesson idea: http://kids-finelines.blogspot.com/2010/10/sunny-day-great-shadows.html  I find that often students need practice in how to press harder to get darkest values and lighter for highlights.


 I like to circulate as students work, asking them to identify their darkest and their lightest areas. Sometimes what they see as dark is nowhere near dark enough to make their drawing "pop". We talk a LOT about this. A value chart can be useful for some.


Once the pencil drawing is complete, students create bands of color patterns using permanent (or watercolor) markers. I like Sharpie fine points for this. I think that this is a good way to review (or teach) color elements at the beginning of the school year ( primary, secondary, complementary, etc.) This would also be the time to point out that the color bands will be curved, following the contour of the rock in order to appear more realistic.


The rocks can be cut out and then stacked, overlapping on a background paper like in the photo below. You could easily turn this into a collaborative project by having students make individual rocks, cut them out and glue them as a class cairn (or rock pile).


For those with more advanced drawing skills, the rocks can be drawn  stacked with overlapping parts and then colored like this:


I like using the book, Three Pebbles and a Song by Eileen Spinelli, as a literature connection for this rock project. 


As I look at some of these rock compositions, I see that you could do essentially the same lesson in the spring with eggs as the subject.

Rock on, artists!!

Monday, August 17, 2015

Why Doughnut Art??

Well, I could say that the reason for making doughnut art is to practice tinting and shading to create the illusion of depth; 

or I could say it is to reinforce the study of shapes; or I could say it is to experiment with color or different media; or learn about Wayne Thiebaud's art . . .  One could go on and on. 

One could also say that I wanted a good excuse to visit my favorite donut shop in Costa Mesa, California (right next to Newport Beach) and buy a bunch of their cinnamon crumb cake donuts -- YUM!! 


After using these as inspiration for art I would, of course, have to eat them. I actually make the trek to this shop (one hour drive each way) often, just to buy the donuts. I eat a few and then wrap the rest singly and freeze them for when the craving strikes. Seriously, these are JUST THE BEST!!!!


But I am digressing -- back to the ART.

This project starts by having students use a ruler to divide a square paper into fourths. That is a whole lesson in itself for some. (How to start measuring at the end of the ruler - or where the zero would be if we considered the ruler as a number line -, how to hold the ruler in 2 places so it doesn't wobble, how to measure and mark in two places so the lines are equal distances apart, etc).

(For younger students, or to accommodate time constraints, you could have each student draw just one donut instead of four.)

Then, using photos of donuts (or the real thing), kids sketch and shade their 4 donuts. Notice that each donut just about touches the edges so that the donut "fills the space." Sometimes I have students use a little photo icon of a light to remind them where the light source is and where the shadows will be as they are shading. (see here for example: http://kids-finelines.blogspot.com/2010/10/sunny-day-great-shadows.html)

Then comes the color. Instead of using just one media I like to put out crayons, oil pastels, colored pencils and paint so that students can experiment with each. This is a good way to introduce use of materials at the beginning of the year and it is a good way for students to discover for themselves the variations that can be achieved with different media. Oil pastels definitely work best for making the "sprinkles" because of their strong color!


 Once these are done, they can be framed as individual pieces of art . . .


. . . or they can be combined into arrays as collaborative works. I actually like this because it opens up lots of possibilities for integrating with math!!
Here we have 4 X 4 = 16.

And here is 4 X 6 = 24 or 6 X 4 = 24 or "What fraction of the group is Jelly Donuts?" or "If you eat half of this box of donuts, how many are left?"  You get the idea:))


A great Literature Connection for this lesson would be to read Homer Price by Robert McCloskey.

 Just think of all the great math questions one could generate with this illustration!! I can remember hearing this story as a read aloud in, I think, my own 4th grade classroom decades ago!!!
On that note, I think it is time for me to go eat a doughnut or two:))

Tuesday, June 23, 2015

It Started With Foam Core

Once upon a time an art teacher had a bunch of left over foam core (yes, that would be me:)). What to do with it?? How about some simple sculptures with a little design thrown in. That is how this all started. All well and fine, but I didn't like it and decided not to use it with kids. That seems to happen a lot when I'm trying to design lessons that will teach something of substance. So I set it aside.


One night I was looking over at it and noticed the shadows created by the raised edges and decided to do a quick sketch.


That made me think of when little kids draw things like tables they often draw the 2 front legs vertically and the back 2 legs protruding out diagonally (instead of leaving them out altogether or just drawing the part they can actually see). I'm not talking about an intentionally abstract rendition, but when kids are trying to represent something realistically and then get frustrated when their drawing doesn't "look real" to them or match what they see. Here we are at the crux of the matter -- what are you really seeing vs. what you think you see. I think little exercises in seeing are FUN and sometimes produce little exploratory gems.

So, curious about how washable watercolor marker shadows would look, using a black Crayola marker, I drew some shadows.


Then, I painted the marker lightly with plain water. (Now, this I like!!)


That was pretty fun!! But, it got me thinking about Holton Rower's drip paintings on plywood art. They truly fascinate me!! 

If you haven't seen this video of the process, it is a good one to check out (HERE).

Anyway, that got me experimenting drawing boxes with dripping paint. Hmm. Drawing the paint dripping is harder than it looks. This would really get kids to focus on changing line direction as the paint moves from a horizontal plane to a vertical drop!!!

This could tie into a Geometry unit. 
A little shading might be a good idea, too.

I think this would be fun to do with older kids.

The final question that came to mind was, "What would it look like to draw a tower looking at it from above?" Instead of using regular blocks, I tried it with organic shapes, using the same watercolor marker and water brushstrokes technique to create the shadows.


Younger students could have a blast with this!!

And just think, all this started with a bunch of left over foam core (which, it seems, I still haven't figured out what to do with)!!!

Hope everyone is enjoying a relaxing summer!

Friday, May 8, 2015

Kindergarteners and Kandinsky

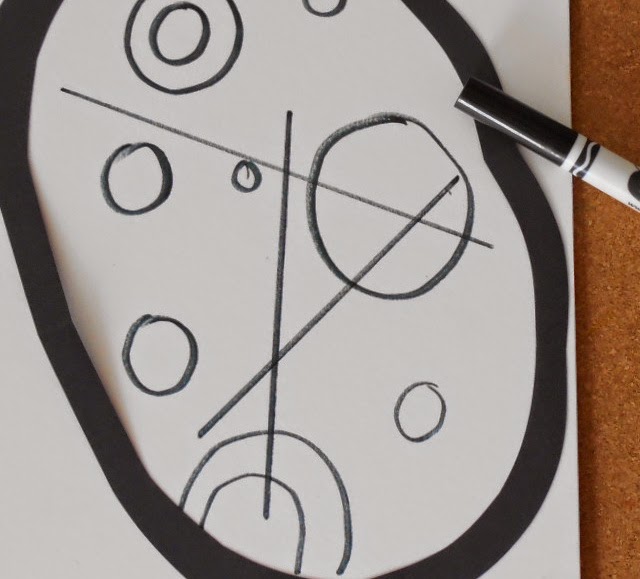
Earlier this year our Kindergarteners made their own renditions of Kandinsky's Squares and Concentric Circles -- you know, the one we all try with kids sooner or later. Well, this week we are taking a look at another Kandinsky work, Circles in a Circle. Here are a few of ours drying in the sun.

And here is a sort of grainy shot of the Kandinsky from the Smartboard. Sorry for the quality of my picture:(
We talked about how many circles we saw, how many lines, size and colors of circles, directions of lines, etc.

Then the fun began. I had prepared part of the large circle with a crayon line for kids to cut to finish it up. I wanted them to practice cutting, but, from experience,  I knew doing the whole drawing and cutting on the fold thing might be too much for the time we had allotted.  They glued their circle on their boards (9" X 12" illustration board - but paper would be fine, too).


I know, this isn't a circle. It was my first sample and it's an oval -- that works, too!!


To decide how many circles to draw inside, we rolled dice at each work table (and drew that many with washable markers - I like Crayola brand markers for this) -- some large, some small, some within other circles - all drawn freehand. I heard LOTS of counting and comparing going on during this part of the lesson!! Using primary colored crayons, kids colored a few circles. Then they drew some straight lines - also with washable marker.


Finally, out came the paint brushes and students gently painted plain water over their marker lines to blur them and get a "painterly" look.


So, what skills did these little ones practice: cutting, gluing (a dot is a lot), drawing (shape, line), color choice and placement (balance, repetition), using a straight edge, use of a paintbrush (we still have a ways to go before we get that all right!!).