Showing posts with label Abstract. Show all posts

Saturday, June 3, 2017

Mini Camouflage Abstracts

Our last project of the year was this little camouflage abstract. 


I say camouflage because each little painting started with a cut-out from a cereal box or catalogue that was glued in the center of the 6" square illustration board. I had a lot of precut recycled cut-outs so kids had quite an assortment to choose from. I tried to have some with several colors and some with only 2 or 3 for kids who wanted something easier.


Then, using Sharpie pens, the kids extended lines from the cut-out to the edge of the board wherever two colors met. You can see what I mean in the above photo. Where the red changes to white, that is the start of one Sharpie line. Kids just moved their finger around the edge of the cut-out, looking for where one color met another.
I also made the rule that one Sharpie line could not cross another.


Then students used water color to try to mix the exact color on the cut-out and extend that color out to the edges of their board. I also said they, as artists, might choose to leave some sections white.


You can see in the first painting in the above photo how this student worked to achieve the variations of blue. These were done by 2nd graders and the concept of making tints using more water instead of adding white was a new skill for many!!


I love the graphic variety in these little gems!! I also told the kids that one of the reasons we were doing them now, was to remind them that they could easily do pictures like these at home during the summer using recycled cut-outs to start them out.

This is one of those absolutely "no fail" projects where everyone is successful. I think they did a GREAT job -- as I look at the photos above I am having a hard time finding some of the camouflaged shapes and I know where they are!!!!

Happy Summer!!


Saturday, August 27, 2016

Oil Pastel Dots for Dot Day - Art Audition #2

With September just around the corner, it's time to start thinking about International Dot Day to celebrate Peter Reynold's book, The Dot. Each year I get engrossed in thinking about all the wonderful possibilities of tying art lessons to this fabulous little gem of a book, and this year is no exception. You can see previous years' lessons here, and here.

The first idea I am auditioning for this year is this simple (and quick) lesson that will introduce oil pastels and pinch-tearing all at the same time.


The supplies are simple: 9 X 12 construction paper pre-cut into fourths, some oil pastels, and a piece of background paper on which to glue the shapes. Pentel is one of my preferred brands because the pastels are soft and easy for students to use with good results.


The first step is to "pinch tear some dots". I would have kids practice this first using scratch paper. You can see a lesson on this by clicking here.


Once students have a few "dots" torn they start coloring areas using either warm or cool colors, using a color wheel as a guide to their thinking and planning.  I like to have them overlap areas of color just a little to see how the colors interact and what new colors appear. Using white to tint some of their colors makes for some nice experimenting, too. You could have students use any color system, not just warm and cool.


I had intended to use just black construction paper, but decided I liked the variety of using lighter colors of paper, too. I also thought about and tested using baby oil and swabs to blend the pastels slightly, but found that that didn't really add value (except, perhaps the lovely clean aroma of the baby oil in a classroom!) to this project. That is one of the advantages of auditioning a lesson first, before using it in the classroom!

The final step is to glue the dots on a background paper (either plain or painted if I want to get a little messier), overlapping edges just slightly.

I am actually thinking about doing this as a collaborative project that will cover a HUGE area, with hundreds of dots!!!

Tuesday, May 3, 2016

Fraction Art

3rd Graders have been exploring fractions, so I thought, "Why not throw in a little watercolor to cement the concept of fractions equivalent to one whole?"
To make the process a bit game-like and give the kids a written model to follow, we started by drawing two cards, one for the numerator and the other for the denominator. This would become "their" fraction.

Using grid paper and colored pencils, students used 2 complementary colored pencils to color squares to represent each part of their fraction. I had a color wheel available to teach the concept of opposite colors on the wheel. This lesson was done in small groups so I was able to spend a lot of time using the mathematical vocabulary AND having students use that same vocabulary as they explained to me and each other what they were doing.
When the squares of their "whole" were colored, they cut it out and glued it onto a background. We used 6" X 6" illustration board, but any sturdy paper suitable for watercolor would do.
 
Next came the watercolor. Students painted shapes that emanated out from their colored pencil areas. This was a good time to talk about brush control and how to lay the brush flat and pull to get straight lines.


 The last step was to write an equation to match their artwork!!


 This was a two day project for most kids, as we let the paint dry before doing the writing, although some groups did it all in one day.


Friday, May 8, 2015

Kindergarteners and Kandinsky

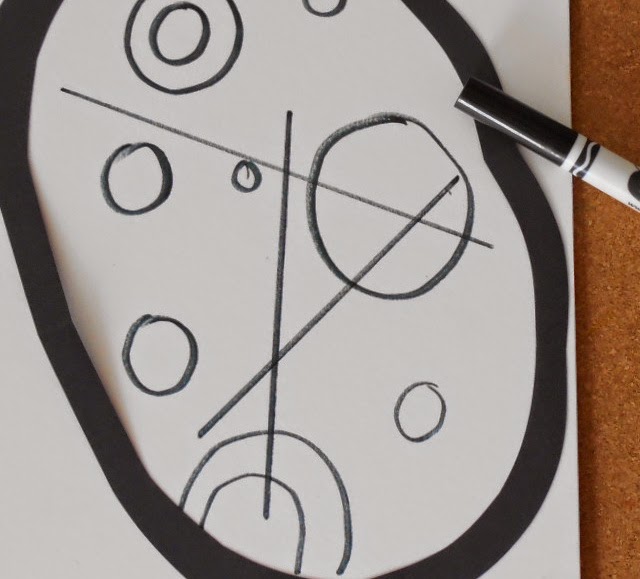
Earlier this year our Kindergarteners made their own renditions of Kandinsky's Squares and Concentric Circles -- you know, the one we all try with kids sooner or later. Well, this week we are taking a look at another Kandinsky work, Circles in a Circle. Here are a few of ours drying in the sun.

And here is a sort of grainy shot of the Kandinsky from the Smartboard. Sorry for the quality of my picture:(
We talked about how many circles we saw, how many lines, size and colors of circles, directions of lines, etc.

Then the fun began. I had prepared part of the large circle with a crayon line for kids to cut to finish it up. I wanted them to practice cutting, but, from experience,  I knew doing the whole drawing and cutting on the fold thing might be too much for the time we had allotted.  They glued their circle on their boards (9" X 12" illustration board - but paper would be fine, too).


I know, this isn't a circle. It was my first sample and it's an oval -- that works, too!!


To decide how many circles to draw inside, we rolled dice at each work table (and drew that many with washable markers - I like Crayola brand markers for this) -- some large, some small, some within other circles - all drawn freehand. I heard LOTS of counting and comparing going on during this part of the lesson!! Using primary colored crayons, kids colored a few circles. Then they drew some straight lines - also with washable marker.


Finally, out came the paint brushes and students gently painted plain water over their marker lines to blur them and get a "painterly" look.


So, what skills did these little ones practice: cutting, gluing (a dot is a lot), drawing (shape, line), color choice and placement (balance, repetition), using a straight edge, use of a paintbrush (we still have a ways to go before we get that all right!!).

Monday, March 30, 2015

Lines in a Ring

 Taking our cue from Kandinsky's "Circles in a Circle", first graders created "Lines in a Ring" last week. I started and ended the lesson with Jeanette Winter's, Henri's Scissors, a great little book about Matisse's collages.

I started by showing kids how to work with their desk partner to fold a piece of paper so that the corners remain together and the fold is even. One person holds the 2 matched corners and the other does a "finger walk" from the open end down to the fold and then creases right and left. (Sorry I didn't get a photo of this process -- it's easier than it sounds!!) Even with my warning and demonstrating AND emphasizing to start and end ON THE FOLD, we had a few who had to re-do!!!


 Then we used painted papers from the previous week to cut and position creative lines. Students worked on the back side, so the hardest thing to remember here was to put the dot of glue on the ends of the PAINTED side of the paper strips. They also put a dot of glue between the intersecting lines.


 The last step was to choose a color on which to mount their creation:))

 Looks like this batch chose yellow or blue backings -- I actually had lots of color choices available. 

It was fun to see how students attacked the arrangement of their lines. Some were symetrical all the way and others embraced asymetrical or totally random.

Saturday, March 7, 2015

Camouflage Collages

Back in January I wrote about this lesson (that I had originally planned to do with 5th graders focusing on color matching and composition). You can see it here. Well, I didn't get to try it with the older kids, so I plunged in with 2nd graders this past week, changing the focus a bit,  and I loved what happened!! They all created little abstract gems!!!

We started with a brief lesson on the Smartboard where students found the lines created where two colors meet and practiced extending those lines. We did a lesson last week where students extended lines out to the edges of their board, so this was easy.  I was using cut up pieces of food boxes (cause you know how I like to recycle!:)) Phyl, over at There's a Dragon in My Art Room, recently posted about artist Michael Albert, who makes his art from cereal boxes, too. So we looked at some of his work before starting our ideas. 

After extending their lines using Sharpie markers, students used watercolors to try to match the colors on the edges of their collaged box piece, and paint that color out to the edges also. They were trying to camouflage the collaged piece, much as animals use camouflage in nature to protect themselves. I taught children how to make tints with watercolors by adding more water to the pigment and mixing in their lids. They were working on a painting mat (just a piece of white cardstock) that they could use to test their mixed colors. I was absolutely delighted to hear kids talking about what colors they might use to mix the exact hue they were trying for.

Sometimes kids ended up with areas that weren't adjacent to the cereal box. I said they could either leave those areas white or choose any color that they thought looked good to paint them. That is why there is blue in part of this painting.
One little practical consideration -- once they were done painting, students had the final job of using a DRY paper towel (I actually cut them up into smaller rectangles so as not to waste paper) to vigorously and completely clean their paint lid so it is ready for the next artist to use.

Here are a few paintings drying on the patio:

It was so hard for me to choose just a few examples to share with you, so I'm posting more than I normally would. Hope you enjoy!!


 Once these were done and displayed, they provided great opportunities for discussion regarding SO MANY elements and principles of art!!!!!!