Showing posts with label Printmaking. Show all posts

Sunday, October 23, 2016

Fall Leaf Art - Audition

Fortunately I have some great trees right outside my home that I can visit to collect motivation for this leaf painting project. 
 Last year I used them for this totally different kind of lesson (here).

This year kids will be using the leaves to experiment with mixing primary colors to make the colors they see in the real fall leaves. Part one of the lesson is to encourage students to keep some colors clear and strong as they paint, rather then ending up with a muddy mess. To do this they start with 4 blobs of yellow in each of 4 quadrants (good math vocabulary) of their newspaper. They have the other 2 primary colors (red and blue) to mix in with the yellow to create their fall colors.
 I like using newspaper for this because a) it provides some texture to the leaf, b) it allows me to reinforce that we can recycle and use found papers at home rather than buying paper to use, and 3) it is really easy for little hands to cut.
On a separate sheet of newspaper kids can experiment with mixing any combination of the three colors, discovering that this is where brown comes from!! Once one discovers it, they all catch on and the muddier the better! Success for everyone.
While these color sheets are drying, each student gets a piece of card stock to experiment with watercolors. This can be done on the same day or a second day, depending on your time constraints. I actually like to do these on two different days, making a whole lesson on the differences between painting with tempera/or acrylics and watercolor. This is also a good time to let kids experiment with what happens when you blot watercolor with plastic wrap, sprinkle salt on it, or spray it with water drops.
When all the painted papers are dry, the composition begins. Kids can trace around the real leaves to make the leaves they will cut out. They can also paint the back of real leaves with various colors (I used white here) and make leaf prints.


When leaves are cut out, students can experiment with composition. I like to talk about size, direction of leaves, and overlapping, depending on the grade level. Sometimes I like to talk about setting one leaf apart (that is why there is only one white leaf in my sample) like Van Gogh had just one white iris in his painting of irises.
I am thinking about having kids cut out around the blue area and gluing the whole thing on another piece of board, like this:
. . . but I haven't quite decided about this step yet:)  That is what auditions are for!!


Thursday, August 11, 2016

Art Audition - Footprints in the Sand (or Tea Bag Art)

I think one of the most fun parts of teaching anything (but art in particular) is trying out new ideas with students and seeing the results. For me, these don't have to be original ideas (but it's fun when they are) just new to me or the first time I have tried them with kids. And I ALWAYS want to "audition" them first at home before introducing them to the classroom. It seems that this is the time of year (2 weeks before school starts) when a lot of these ideas start percolating. I thought it would be fun this year to share with you some of these "art auditions!"

Here we go with the first one:
Footprints in the Sand or Tea Bag Art!!

Last January, following joint replacement surgery, I was told to walk EVERY day, and I have been pretty consistent in following through. While walking in my local park, on the sand and gravel pathway, I noticed the variety of footprints imprinted in the path and thought, "Wouldn't kids have fun with this!"

Step one is to create the sand. Great use for all those used teabags after making ice tea!! Coffee would work, too. Pressing lightly on the bag creates a light beige, leaving the bag a few seconds before lifting up results in a darker tone. Good time to talk about value.


Overlapping the tea bag prints is pretty important for an over all sandy look.

I didn't even wait for the background to dry before printing the soles of a few shoes. In the classroom, kids can trade shoes to make a variety of sole designs. I used pastels that I dragged across the sole and then just printed it on the damp background. If you want to get a little messier you could try this with paint!! I didn't think I wanted to try cleaning paint out of all the grooves, though. **Have plenty of water and paper towels for kids to clean their shoes after printing.


For younger students I would probably stop after they had covered their "sand" with footprints. Older kids could use black Sharpies to outline the patterns on the shoes, as in the example below.
In my last post I had this photo of a local mural where a boy is looking towards the beach through his binoculars. 

I think I would probably have kids discuss this mural, which is on a wall that is walking distance from school, as well as Dr. Seuss', Oh the Places You'll Go! , as a part of this lesson.

Sounds like fun, huh??!!
Hope you are all having fun thinking about getting back into the swing of things!!

Saturday, October 18, 2014

Pumpkins in Puddles

Around this time of year I ALWAYS have a yearning to draw pumpkins, or to teach kids to draw pumpkins. However, because of parent conferences and Halloween scheduling I almost never am working with students these last weeks of October. So we will probably get around to this lesson next month as an Autumn theme art project, but I just can't wait until then to post it here because it's really fun to do and would be great for Halloween!

We'll start with drawing step-by-step pumpkins.  I use regular copier paper for this. First, you fold it in half. Students draw their pumpkins on the fold, leaving the bottom of the paper blank. I have to make a run to Target tomorrow to stock up on Crayola Classic Watercolor Markers -- the best I've found for this reflection technique. (See a previous post using markers and water to create reflection in a city scene by clicking HERE.)

 Notice that we draw with a darker color first, brown or purple works well. This creates the look of depth in the creases of the pumpkin.
 When coloring in with the orange it is important to leave spaces white where the highlights would be. I usually bring a flashlight and a pumpkin to school so that kids can actually see how the light source creates that highlight. It also helps to add darker color shading on the underside of the pumpkins. We often add a few tendrils as a last step.
When their drawings are done, students paint plain water (lightly) on the bottom half of the drawing and fold it up onto the drawing. They press the entire area and then pull up to reveal the reflection.

All of this can be completed in one 45-minute session. However, if you would like to go a step further, when the print dries, kids can add crayon details for the straw the pumpkins are sitting on, extra shading on the pumpkins, etc. The first example at the start of this posting has that and some pencil details to delineate the puddle effect.

There, now I have satisfied my yearning for pumpkin drawing. When we finally get around to doing this little project in class, I'll be sure to post student results:))
Happy Halloween, everyone:))

Thursday, May 1, 2014

Kindergarten Fireworks

With Memorial Day and then the 4th of July coming up, kindergarteners started thinking about fireworks today. The fact that it was 90+ degrees here at the beach today helped us think about summer!!

I projected images of various fireworks paintings that I found in a Google search on the Smartboard for students to compare and discuss. We particularly focused on the direction of the lines. Then, using Ellen Stoll Walsh's Mouse Paint, we reviewed what colors can be mixed using primary colors. And then the fun began:

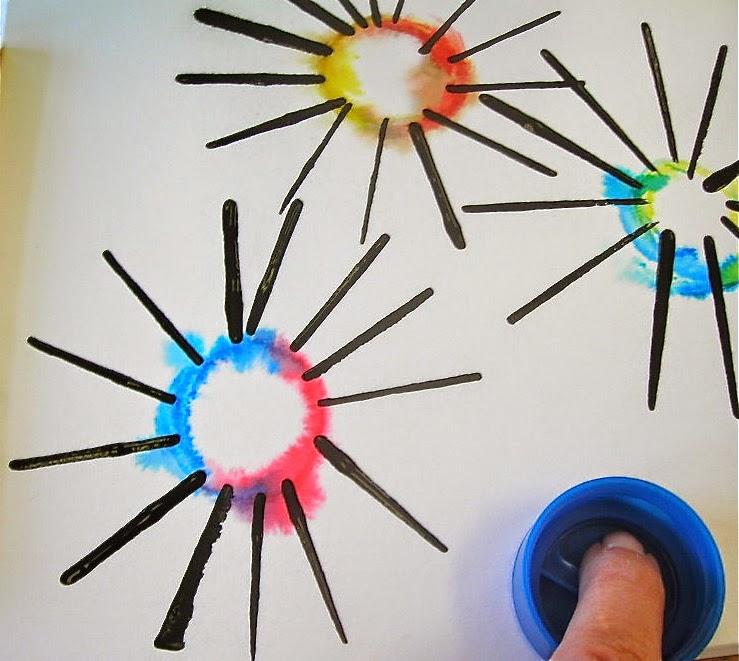
First, using washable Crayola markers, students colored half of a lid in one color and the other half in another color.
Then they brushed plain water on the area of the board they were planning to print and twisted the lid as the firmly pressed it onto the board. It was important to use plenty of water on this very warm day!!
 I asked kids to predict what their "mixed" color would be. They were delighted to see how the marker turned to paint and ran every which way on their board!!
When everyone had printed 3, 4 or 5 circles, I demonstrated how to dip a piece of board into black tempera and print the "rays" around their fireworks.


 Some lines would "bump into" other lines -- that was great. Some lines would "go off" the page -- also great. It was fun watching kids plan the placement of their lines.
This is one of those lessons that is "just right" developmentally for kindergarteners to play around with. We heard a LOT of "Oh, look, I made orange!!" and "It's purple -- look at how it is running into the water!!" and "It's just like exploding fireworks!! -- When will I get this back??" The paintings came to life with the addition of the black!
When they are dry I'll post some of the results.

We didn't have time to extend this lesson today, but adding a building or 2 to the composition would be fun -- maybe talking about artist James Rizzi.
This building is painted foam core with cut construction paper windows.

Saturday, March 8, 2014

Gyotaku and Bubble Wrap

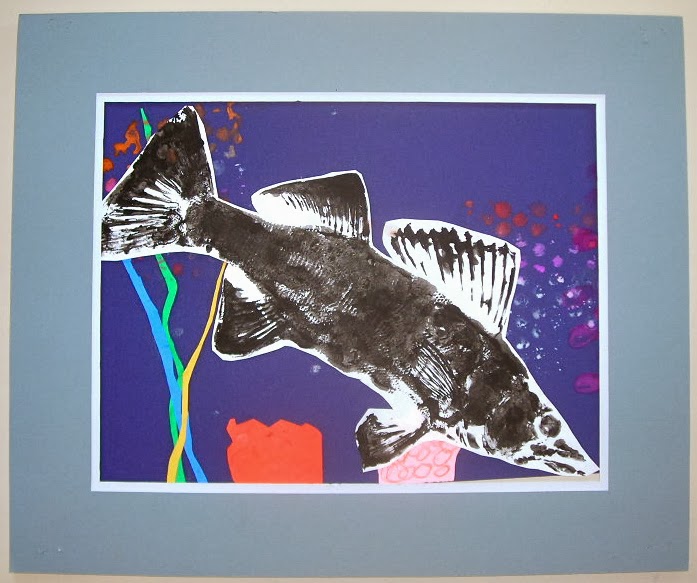
This past week 2nd graders finished up their month's rotation with me finishing up their Gyotaku. They loved adding the final touches to their underwater collage using bubble wrap to make -- what else -- BUBBLES!!
You have seen this lesson here before. The full lesson is HERE.


Kids used cake tempera in whatever colors they wanted to make their bubbles.
They had pictures of coral, sea grasses and kelp to help them form their collage elements. We discussed currents and how the movement of water would cause light weight grasses move around, too.

 Notice how some fish are angled up or down. We had talked about diagonals as fish were, perhaps, swimming either up or down to go after food!


Wednesday, November 20, 2013

Collagraph Hands

I wish I had more time to do printmaking with students. Many are so timid as they approach the project and would benefit from more time with lots of different kinds of prints. Most of our 3rd graders were here in the school last year when they did gyotaku (Japanese fish prints), so I know they have at least had that experience. This lesson came from Mrs. Crosbie's wonderful blog in Angus, Scotland. (See her lesson here.) If you haven't visited her blog yet, be sure to spend a little time browsing when you link to it!!
Kids started by tracing their hand and cutting it out. They then used that cut-out to trace and cut out another hand in a different color. I used 2 different colors for the hands to avoid confusion. They cut out the sections of one hand and glued those pieces on the other hand. See picture below to see them drying. Some students did better than others at this. Several had a hard time cutting and staying organized as they glued the little pieces even though I cautioned them to cut and glue only one finger at a time. I limited their cutting to thumbs and finger parts only -- I felt the palm lines would have been too confusing for this group.

When the printing plates were dry, on another day, students painted the hands and used them to print on an 8" X 10" board. They had white and 2 colors to choose from for paint. We talked about how to position the hands so the fingers pointed in different directions creating a variety of angles. Several students commented on how the white prints in particular reminded them of bones!!!

You'll notice that I used paintbrushes instead of printing brayers. That was a decision I made in the interest of time. I only have 8 brayers, but I wanted 15-16 kids to print at one time. I had 2 different printing tables set up. We were trying to finish up 2 projects and one day, so the time consideration won out!!

Here are a few of the finished projects:
When I returned the prints to students I gave them their hand plate separately so they could use it at home to try printing some more. However, I think the printing plate would actually look good mounted on the print itself.


Friday, October 4, 2013

Finished Gyotaku

Well, this week we finished up our Gyotaku. Colored the eye of the fish, cut it out (throwing the wadded up scraps in the scrap bowl on the table) and glued with little dots around the edges onto the ocean scenes they made last week. (see here)