
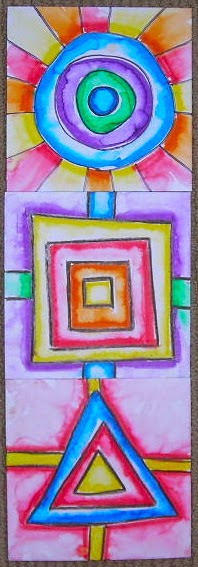
Students, using my favorite Stayonal crayons, drew a small shape in the center of their board. We were using 6" X 6" squares. They measured one finger width from their first shape and drew another shaped around the first one. They continued doing this, pressing very hard with their crayon, until they got close to (but not touching) the edges of the board. They added little "roadways" at the midway point of each side running off the board. These were so we could connect the squares later.
Then it was time to add color. Students used any colors they wanted (although we had reviewed primary and secondary colors before starting) and drew a "fat line" right next to each of their crayon lines. Then they brushed clear water over their marker line and watched the color "travel" into and on the water. Some said, "It's like magic!" They learned that it was important to load the brush with water.


Part of the focus of this lesson was to provide practice tilting the marker at the right angle to get a thick, rather than thin, line of color.

Another focus was on how to use a water color brush keeping the bristles smooth, cleaning it with water and laying it on the table (or a tray) when not being used instead of leaving it sitting upright in the water container. I used my Mr. Brush chart before we started to reinforce these brush rules.


Great! Love them as a group Christie.
ReplyDeleteThanks, Mary. I'm looking forward to putting up another bunch in one of our hallways tomorrow.
DeleteI agree with Mary -they look great!
ReplyDeleteThis will seem silly - but this project just gave me an idea for a related project. Something about these shape paintings reminded me of abstract people with their arms outstretched. Wouldn't it be fun to make them into little people, and when you display them, they'd be all holding hands!
Yes, it would. Cool idea!!
DeleteWhat are the "boards"? Or can you use watercolor paper? This looks like a fun lesson!
ReplyDeleteWe were using 6" X 6" mat board. A local framing store saves their "scraps" for me. I re-cut it to the sizes we generally use (9 X 12, 8 X 10 and 6 X 6) and use that as much as possible for our art. I like the idea of recycling and it saves us money. However, for this project, watercolor paper or even a heavy quality (90 lb) drawing or sulphite paper would certainly work as well.
DeleteThese I think could be very effective for older children too, to do them in different shapes. Yours look lovely.
ReplyDeleteOur color didn't spread as much -- do you think it was because of the different paper? We used water color paper. Are your mats "shiny"?
ReplyDeleteWe used a mixture of random illustration and matt board that I get donated from a local frame shop, so I am not sure of the brand. Occasionally I will get one or two of those that don't spread as well, but not often. However, watercolor paper should work well consistently. I just gave it a try on some cold-press watercolor paper I have here and the color is running freely. I have also used this media with 90# drawing paper and it has worked fine, too. I am using Crayola Washable markers. That is critical -- permanent markers and even some of the off-brand watercolor markers don't seem to work as well. Hope it works better for you if you try it again. The kids really love watching the color spread!! Good luck with it.
DeleteThis is a great project! I am just doing some art with my daughter at home, so I have no formal art education (I have an early childhood degree, though)... anywho... just wondered what kind of crayon you used and if you can use any black crayon or if it would bleed over the line, more?
ReplyDeleteI think regular Crayola black crayons would work just fine. Have her press hard on the crayon. I tell kids that the wax in the crayon is like a wall that keeps the color in its own area. Hope you and your daughter have fun with it!
DeleteThis is a wonderful idea! I'm looking forward to trying it.
ReplyDelete