Wednesday, August 12, 2015

Art Teacher Challenge

I'll bet a lot of school auditoriums or meeting rooms look something like this before the school year starts. This is our auditorium--two very long bulletin boards extending down both sides of the length of the room.

Who gets to transform this room with a little art magic?? People like you and I. Luckily I got a couple of good friends (newly retired) to come and help me with the transformation this year.

Last week I was painting captions and spattering them in my bathtub with primary colored paints.
Today it all came together with design backgrounds, lettering and most important, children's art that I had saved from last Spring to post now. Here are all the creations with links to their lessons: (regular readers will recognize most of these lessons from prior postings)
Link to Dot lesson: http://kids-finelines.blogspot.com/2015/05/lots-of-dots-in-kindergarten.html

Collage Kitties
Link to lesson: http://kids-finelines.blogspot.com/2012/11/collage-cats.html

Collage Fish: http://kids-finelines.blogspot.com/2015/03/im-pretty-sure-i-could-be-happy-doing.html

Crooked Buildings, Crooked City: http://kids-finelines.blogspot.com/2015/06/art-and-math-everywhere.html


Intersecting Lines in a Ring: http://kids-finelines.blogspot.com/2015/03/lines-in-ring.html

Circles in a Circle: http://kids-finelines.blogspot.com/2015/05/kindergarteners-and-kandinsky.html

So what to do now while I wait another week for school to start?? Think I'll kick back with an iced mocha and read. I seem to be on a mystery tangent lately and have this whole stack lined up to entertain me as summer creeps to an end.


For those of you who have already started school, I hope you are off to a great start!!

Thursday, August 6, 2015

Cakes Revisited

I was recently asked by a reader how to draw cakes like the oil pastel ones below (which I did with 5th graders a few years ago during a study of Wayne Thiebaud).

I thought maybe I had directions somewhere on the blog showing the steps I used that I could refer her to, but I couldn't find any. So, here is a quick step-by-step. Hope it helps!!

Of course, you could just bake up (or buy) a luscious cake, cut out a slice or 2 (which you could eat as a snack at recess time), project the cake onto a screen with your document camera (if you have one) and let the kids do an observational drawing. Just sayin' -- it's an option:))

Here is what a whole bunch of cakes look like. You may notice that kids made their cakes whatever number of layers and flavors they wanted and decorated however they liked. We also talked a LOT about "light source" and where the shadows would be. The platters were sandwich foil that I got at our local Smart & Final and they were glued first, before the cut out cakes were glued on.


Tuesday, July 28, 2015

Tints, Shades and Big Sky Country

Clouds, clouds and more clouds . . .

Montana is such a great place to appreciate the sky and clouds. When you need a picture of clouds and the sky is clear, you just wait a little while and then go outside and there they are, rolling in and bringing some thunder and lightning with them. 


Notice how the sun back lights the clouds. This is what I like to focus on in this lesson. It works with the moon, too!


I LOVE giving kids pictures like this to use for value/color experiments.

First, they create a sky background -- either dark to light like the photo below, or concentric circles around a moon or sun (like the first photo above).


Then come the clouds, also dark to light. I like to provide students with lots of photos to use as reference because the light is different in each setting.


When everything is dry, they cut out the clouds, leaving a border of white paper around part of the clouds for the back light, and arrange them on their sky, as in the first photo above.

Pretty soon we have LOTS of storm clouds brewing!!

What else does Montana scenery provide for the art room? Well, how about these:

1. I like this for foreground, mid-ground and background with strong colors in the front and pale colors in the back. It also illustrates large items up close, smaller items in back.
 2. Here is another example of larger trees up close, smaller trees in the distance. 
 3. I do love river rocks and find that they are a good way for kids to practice shading and shadows either with "real-life" colors or Fauve-like hues. More on that later:))

Hope everyone is enjoying the last few weeks of summer vacation before it is time to start thinking of re-booting for school:))

Wednesday, July 1, 2015

Apricot Art - Sweeter than Ever!!


July around here means that the Blenheim Apricots are at the See Canyon stand at our Farmer's Market for 3 weeks. So each week I buy a new crate and the jam making begins in earnest!! When I get really motivated, I top the jars with these luscious colored cupcake liners and paint apricot gift tags to put on each jar. Such a labor of love!!


I wish you could smell the aroma permeating through my kitchen right now!!!!!


When the jam is done, I take the remaining apricots, split them in half and flash freeze them for a couple of hours on a cookie sheet. Then I dump them all in a 2 gallon bag and pop them in the freezer. That way, if I get hungry for an apricot pie a month or two from now, I still have them available. I tried this last year and used apricots right up until May to make pies and crisps!!


A friend of mine tells me that she eats the apricot jam I give her by the spoonful, right out of the jar. That got me thinking. I often drizzle honey on Greek yogurt for my breakfast, so this morning I tried a spoonful of apricot jam instead of the honey. YUM!!!


OK -- all this apricot talk is making me hungry. I am off to bake a pie:))

Tuesday, June 23, 2015

It Started With Foam Core

Once upon a time an art teacher had a bunch of left over foam core (yes, that would be me:)). What to do with it?? How about some simple sculptures with a little design thrown in. That is how this all started. All well and fine, but I didn't like it and decided not to use it with kids. That seems to happen a lot when I'm trying to design lessons that will teach something of substance. So I set it aside.


One night I was looking over at it and noticed the shadows created by the raised edges and decided to do a quick sketch.


That made me think of when little kids draw things like tables they often draw the 2 front legs vertically and the back 2 legs protruding out diagonally (instead of leaving them out altogether or just drawing the part they can actually see). I'm not talking about an intentionally abstract rendition, but when kids are trying to represent something realistically and then get frustrated when their drawing doesn't "look real" to them or match what they see. Here we are at the crux of the matter -- what are you really seeing vs. what you think you see. I think little exercises in seeing are FUN and sometimes produce little exploratory gems.

So, curious about how washable watercolor marker shadows would look, using a black Crayola marker, I drew some shadows.


Then, I painted the marker lightly with plain water. (Now, this I like!!)


That was pretty fun!! But, it got me thinking about Holton Rower's drip paintings on plywood art. They truly fascinate me!! 

If you haven't seen this video of the process, it is a good one to check out (HERE).

Anyway, that got me experimenting drawing boxes with dripping paint. Hmm. Drawing the paint dripping is harder than it looks. This would really get kids to focus on changing line direction as the paint moves from a horizontal plane to a vertical drop!!!

This could tie into a Geometry unit. 
A little shading might be a good idea, too.

I think this would be fun to do with older kids.

The final question that came to mind was, "What would it look like to draw a tower looking at it from above?" Instead of using regular blocks, I tried it with organic shapes, using the same watercolor marker and water brushstrokes technique to create the shadows.


Younger students could have a blast with this!!

And just think, all this started with a bunch of left over foam core (which, it seems, I still haven't figured out what to do with)!!!

Hope everyone is enjoying a relaxing summer!

Thursday, June 4, 2015

Art and Math Everywhere!!!

Two weeks ago, when kindergarteners started creating their buildings for a collaborative EXTRAVAGANZA to be revealed in August when school starts up again, I thought the focus was going to be the use of Color, at least that's what my lesson plan indicated.


Well, I was only half right -- read on . . .

I started with a Smartboard presentation on "crooked and colorful buildings in the world" with a focus on the art of James Rizzi and the architecture of our local star, Frank Gehry. In 1978, Gehry remodeled his family home experimenting with some building materials that were pretty unusual at the time. He, of course, has gone on to design some spectacular buildings that seem to soar into the space around them with anything but perpendicular walls! Since his house is walking distance from our school, it seemed that a look at some of his buildings around the world would be a good place to start our classroom discussion.


Then our art began. Kindergarteners spent Day One painting buildings a variety of colors using cake tempera. First, I modeled how to paint using the broad side of the brush to get fatter lines AND how to paint all in one direction.


Then we switched to liquid tempera to paint the windows. I demonstrated how you can let the brush do the work of painting the squares and rectangles by just pressing and painting a short stroke. Students also tried to paint their windows in straight rows to indicate floors in a building.


 We let these buildings dry.

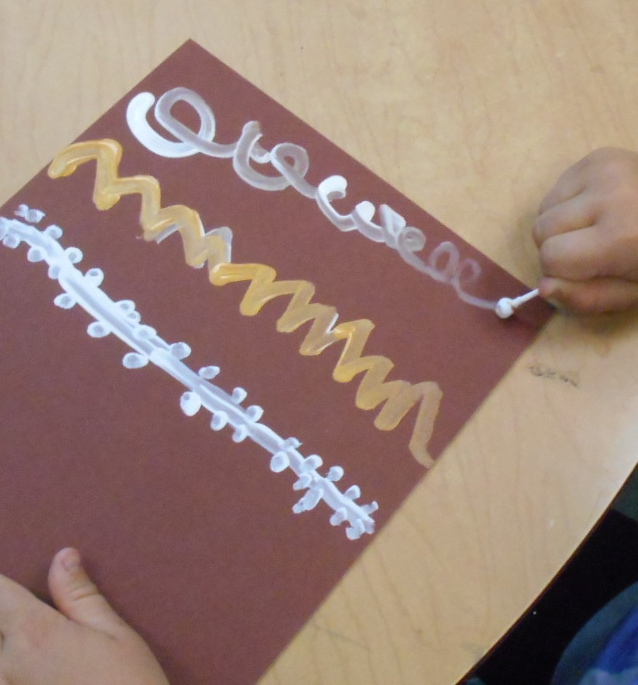
On Day 2, using white and GOLD tempera and Q-tips instead of brushes, kids made a background using line designs that we had learned about three weeks before.


While the paint was drying a bit, kids outlined their windows and doors with a Sharpie. And this is where the MATH popped up and took over. One little boy started counting his windows as I walked by. I stopped to watch and talk to him about this (he had 24) and the rest of the table got wind of what was going on and started counting. Well, pretty soon everybody was counting.


It would have been fun, time permitting, to have figured out how many windows there were in all, but since time was running out, I posed the question, "Do you think we have more or less than 100 windows in all?" That led to some pretty interesting responses!!


As I said, I am saving all of these "crooked creations" for a giant crooked city display in the Auditorium for when school starts in August. Be sure to check back for the big reveal!! AND . . . have a glorious and rejuvenating summer!!! 

By the way, I first did this lesson with 5th graders a number of years ago with a bit more emphasis on design details on buildings and use of complementary colors. You can find that lesson HERE.

Sunday, May 24, 2015

Flags for Country

It always amazes me that volunteers (including Boy Scouts and Girl Scouts) place each and every one of these little American flags at the 114 acre Los Angeles National Cemetery. They read each of the nearly 87,000 names (including my grandfather, who served in WWI) and offer a salute as they place the flags. The first internment here was May 11, 1889.


Enjoy your week-end --- it's almost summer:))