Showing posts with label Texture. Show all posts

Wednesday, January 14, 2015

Color Matching and Composition

Here's a little one day project that incorporates using a lot of art skills: composition, color matching, line, balance, repetition, mixing colors, brush techniques, -- you get the idea.
Perhaps best of all, it starts with recycled boxes/magazines -- my favorite!! This means I get to reduce the size of my saved cereal box stash!!

This example started out with a raisin bran box. Kids can cut whatever shape they like, although I found that areas where different colors meet (like the stripes in the cereal bowl here) are easier when it comes to finding lines to extend.
 I forgot to mention that this project provides yet another opportunity to practice making SMALL glue dots!
 Then come the lines. Everywhere that two colors meet provides a line to extend onto the background. I like when the recycled piece offers the inspiration for variety in the lines. Notice straight vs. curvy, crinkly vs. smooth, etc. Kids have so many choices to make. They can stay with the direction the line has in the original drawing, or let their imagination go as they extend their lines in whole new directions.
 Mixing the colors to try to exactly match the original color is a skill that students perfect as they mature, but I think it is good to start practicing early. It gives them an awareness of subtle gradations of color and they can start to develop their ability to manipulate the paint colors.
 Some areas may not be exact extensions of original color and students have the opportunity to use balance or repetition as they select colors with regard to the whole composition. For example, the areas in the lower right below are trying to balance the yellow-oranges in the upper left corner.
I think some of these make great compositions with just the recycled picture and the black and white line background.
 Many of the original pictures provide opportunities for students to experiment with reproducing textures. The lower left example below started out as a cake box. Getting the bumpy texture of the cake was a challenge to mimic with watercolor!!
The only problem with this project is that it is a bit addicting and once you have done one, you start looking for other great pictures to start cutting up. As I am eyeing the last cookie from this Trader Joe's holiday cookie box I am already getting the scissors ready!! Just look at all those luscious lines!!
Enjoy!!

Saturday, September 20, 2014

Stellar 4th Grade Still Life with Vincent

4th graders have finished their still life fruit baskets that they started 2 weeks ago. I must say that I am ABSOLUTELY IN LOVE WITH WITH THESE!!! I look for excuses to walk up this hallway so I can look at them.
You can see how the lesson started by clicking here. For part 2 of the lesson scroll down on this page.

Why do I like these so much?? Well, first, almost everyone remembered to highlight where the light shone on the fruit.
 We did the first citrus fruit together so that I could remind students how to blend oil pastels smoothly and most of their shading was gradual and realistic looking.
 There were a lot of gasps as the kids finished the final layer of their shading and marveled at what they had done!
 I also love the overlapping of fruits to give the appearance of depth.
 The baskets have a nice textural look, too.
The majority of artists captured the "small brush stroke" look of Van Gogh's background, even though they were using a different medium (chalk pastels). Most also darkened the place where the two walls came together behind the fruit, giving the space even more depth.


sorry for the focus on this!

The Process:

On Day #1 the kids made their baskets and most of their backgrounds. You may recall that we were aiming to create a background with the same "feel" as Vincent Van Gogh's in Basket with Six Oranges.

At the end of Day #1 this is what we had:

 Nice layering of colors in these!!

 You'll notice that the bottom piece below has the basket glued upside down -- oops! It will be interesting to see how that gets fixed on Day #2:))
 Day #2 started with a discussion focused on this Vincent Van Gogh quote (which I saw in passing on Pinterest):
            "Great things are done by a series of small things brought together." 
I asked students what they thought this sentence meant. It was an opportunity to talk about "small moments" in story writing, the parts that make up equations, small fruits assembled to create a whole basket, etc.  What a great cross-curricular discussion!!

Well, back to art. Using oil pastels this time, students made one fruit with me modeling on the document camera and big screen.. This was my opportunity to review shading, size and the use of baby oil and stippling to give the citrus fruits texture. After making the first fruit with me, kids were on their own for the rest of their still life fruits.

 There were a few kids in each class who were thinking ahead and made the observation that they could use this technique for other art, like making planets or soccer balls. Don't you just love it when kids do that!!!
 Notice that the fruits are not diminutive in size, which is often the case. That is because I asked students to "bump" all 4 sides of their square yellow paper. I used yellow to ensure undertones for these fruits.
 As fruits were cut out, students slid them in the slit in their basket so they could visualize what other colors would look good in their basket and how they might arrange their fruits prior to gluing. The final step was to glue the fruits, using small dots of glue around the edges.

After a little time on the drying racks, it was time to display these wonderful works of art in the school's hallway!!!

Tuesday, July 22, 2014

Texture Boards

I have long thought of making a set of texture boards for rubbings and/or printmaking.

Today I got around to starting the project. I cut up some foam core board and started rummaging around for stuff to add texture to them.


Strips of cut file folders

Staples

After making 5 or 6, I got to thinking about the wisdom of this approach. Why should I be the one thinking about texture and repetition instead of the kids. So, Plan B is to pre-cut the foam core boards, assemble a collection of stuff that I have at school (staples, string, yarn, glue, etc.) and have each student make one texture board that will become a part of a class set to be used in their classroom. I'll have a small set of extras on my art cart. YIKES!! There, I said it again. I really will be teaching art from an old audio visual cart in the regular classrooms this year.

After the texture boards are done students will use them for the background of a collage that emphasizes repetition, value, contour lines and the use of text in art.

 While each texture board represents repetition in some way, I would also like students to think of repetition (of texture, line, color, etc) in their overall composition, too.
 When the background is completed, kids will collage text and pictures as well as adding detail with pen. The example below also has some shaded crayon drawings to cut and glue on. I'd like to have that element to help focus on value.
An added step might be to cut out the entire piece and glue it on a dark background board to frame it.

Sunday, June 22, 2014

Textured Background and Contrast

The meanderings of a Saturday afternoon:


Sometimes the idea for a piece of art comes from whatever surplus items I happen to have around. The other day, as I was cleaning out a closet, I came upon by bag (or, to be more precise, BAGS) of leftover yarn. And so this art project began...

First step was to wrap and tape some yarn to a piece of board.


Next, I painted the whole thing. I used primary colors, but I am thinking that kids could use whatever color theme they like.

Then I unwrapped the yarn, but wasn't all that happy with it because of the lack of contrast. Think I'll give it a try using liquid tempera instead of cake tempera.
However, as it dried I noticed there were some darker areas . . . I thought, "Maybe if I just make them darker." So, out came the crayons.
I find that one of the hardest things to teach elementary students is to "see the darks" and get a full range of value. This might be a good exercise for that.
I chose dark values of crayons and deepened the painted areas that were already a bit dark. Huge improvement!!
Satisfied with the results, I went back to my closet organizing. Right in front was my newest project (which I found through Pinterest here - it's a great tutorial!) -- twisted twine made from fabric scraps (which I have in abundance in another cupboard!!). Maybe fodder for a future post!

This, of course triggered phase two of my little art project -- some lines. At first I made a black and white line and then tried a secondary color line to mimic my twine. I wasn't sure which I liked and left them both sitting there on the background while I continued my closet project. When I came back I started moving the 2 lines around and intertwining them until I found a composition that I liked.


I think this will be a good process for kids at school to reinforce how artists often don't just crank things out at one time, but rather, mull over their options and discover new solutions:)) And now, back to my closet . . . ho-hum . . .

Saturday, March 8, 2014

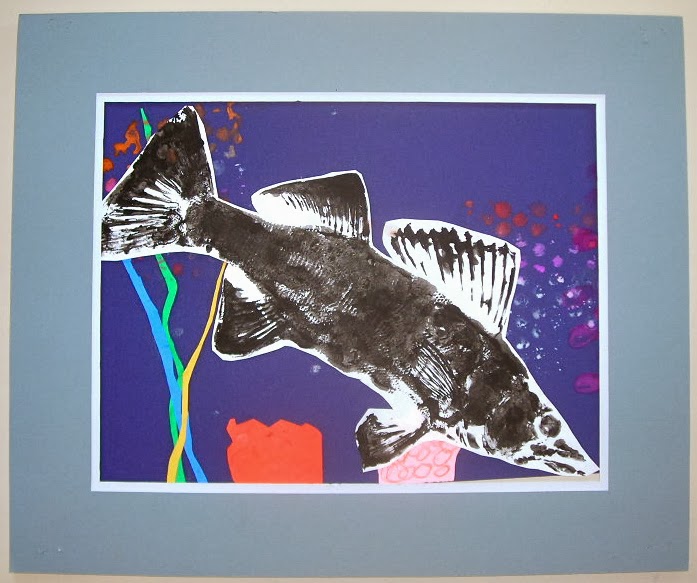
Gyotaku and Bubble Wrap

This past week 2nd graders finished up their month's rotation with me finishing up their Gyotaku. They loved adding the final touches to their underwater collage using bubble wrap to make -- what else -- BUBBLES!!
You have seen this lesson here before. The full lesson is HERE.


Kids used cake tempera in whatever colors they wanted to make their bubbles.
They had pictures of coral, sea grasses and kelp to help them form their collage elements. We discussed currents and how the movement of water would cause light weight grasses move around, too.

 Notice how some fish are angled up or down. We had talked about diagonals as fish were, perhaps, swimming either up or down to go after food!