Sunday, March 30, 2014

1st Grade Deer in the Forest

I know that birch tree forests have been around for a long time in art classes, but I had never tried them with kids until last week. What fun!!

We don't have such things as birch forests around these parts and we certainly don't have cardinals, so this was a real learning experience.

Kids began with Smartboard images of birch forests and a discussion about foreground, and background. Then they each got a board that was "pre-taped."
We talked about starting to paint the ground high enough on the board so that the shortest tree trunks weren't left "floating." Students painted a clear water wash first and then added their ground colors (choosing their season). Then they did the same with the sky color. By then the ground color had dried a bit and kids added their cast shadows of the trunks. I demonstrated how to lay the brush flat on the board and apply some pressure as they painted the diagonal lines.

Next they peeled off the tape and used a small piece of illustration board and black liquid tempera to scrape black onto the trunks.
For some classes, this was as far as we got. I especially loved how kids approached putting on the black in different ways.

 LOVE the movement and repetition this little guy got going!!


Some classes had more time, so they added some animals to their forests. This was a more directed lesson. I began showing the kids a photo of a doe in the forest and drew the shapes I saw on the animal using a piece of acetate over the deer.

Then I moved the photo away so they could see just the drawn shapes on the acetate. Next,  we drew the deer step by step.

Students had the choice of where to place the deer in their forest. I showed them how they could cut the deer up the middle and glue each half on either side of a tree to give the impression that the deer was walking behind a tree. For some kids, this was a real revelation!! After these went on display in the hallway, I also had a few adults stop me to ask how the kids had done this!!

 I must say, I was a bit nervous about trying this directed drawing lesson with first graders, but they all got the hang of it. I would definitely do it again!


Wednesday, March 19, 2014

Shape with Splat the Cat

Rob Scotton's, Splat the Cat, offers many opportunities for primary learning activities. 1st graders explored painting and cutting shapes to create their own version of Splat.

Students started with the basic shapes for their cat -- a large oval with triangle ears. The arms and a tail were options, too.


 Kids used a brush to paint these main shapes, but for all those skinny little hairs, they switched to homemade paper "combs."


The details of eyes, nose, mouth and pink for the ears and paws were done with cut paper and glue, so everyone got a little practice with those basic skills.

For most classes we let our Splats dry and added final touches on a second day.

When the paint was dry, a little pink crayon on the tummies finished off our Splats.


I loved the variety of personalities represented. Somebody thought to add a belly button to this one:
And this little guy with 2 arms up looks ready to spring onto (or after) something!!

Thank you, Rob Scotton, for the delightful stories. And thanks to the photo on Pinterest that directed me to this blog that had the idea. Maybe we'll try Splat's pet mouse Seymour, next!!

Monday, March 10, 2014

Monet Saw Haystacks, We See Menchies

After talking about how artists choose their subjects, 2nd graders had fun making pretend Menchies frozen yogurt sundaes with oil pastels. (Menchies is the yogurt shop across the street from our school.) I did this earlier in the year with 3rd graders and they had such a great time decorating their make-believe sundaes that I had to do the lesson again! The link to that lesson is HERE.

First we looked at Monet's study of light on haystacks at different times of the day and in different seasons, noticing how the light on the haystacks made them look 3 dimensional. I loved the way one little guy raised his hand and asked,  "Wasn't he the guy who painted lilypads in the pond in his garden?" That, of course, led us to a side conversation about Giverny and Monet's fabulous garden! We also took a peek at a few Thiebaud paintings with cylinders to see where the light was coming from for him. Kids got pretty proficient in identifying the direction of the light source directed at cylinders. Last, I used a flashlight shining on a real Menchies cup to solidify the concept.


When we did this lesson with 3rd graders, the folks at Menchies took note and sent us this cool acknowledgement!!

Saturday, March 8, 2014

Gyotaku and Bubble Wrap

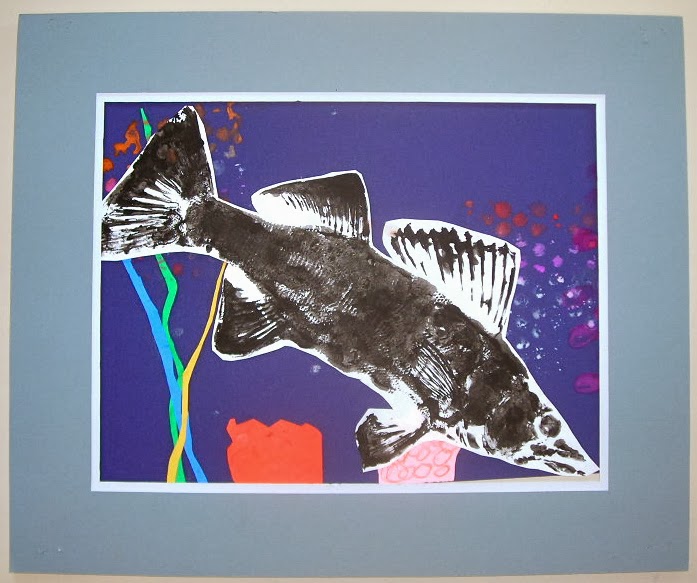
This past week 2nd graders finished up their month's rotation with me finishing up their Gyotaku. They loved adding the final touches to their underwater collage using bubble wrap to make -- what else -- BUBBLES!!
You have seen this lesson here before. The full lesson is HERE.


Kids used cake tempera in whatever colors they wanted to make their bubbles.
They had pictures of coral, sea grasses and kelp to help them form their collage elements. We discussed currents and how the movement of water would cause light weight grasses move around, too.

 Notice how some fish are angled up or down. We had talked about diagonals as fish were, perhaps, swimming either up or down to go after food!