Monday, January 31, 2011

Japanese Notan

This week, 5th graders will be considering line and shape as they create positive and negative space in a Notan-inspired collage. We'll begin by looking at some examples of the Japanese tradition as well as some more contemporary collages. Examples include symmetrical and assymetrical designs.

I plan on having students prepare their base paper by applying strips of a musical score, which will show beneath their cut paper work, creating a first layer.

Next they will fold their square of black paper in fourths, write the word fold by the 2 folded edges and cut out shapes along the 2 outside edges (the edges NOT folded). These cuts should be fairly near the folded edges to start out. The examples below show the steps done on white paper so that you can see better what I am doing.
Writing the word "fold" helps students remember NOT to cut there!

After shapes are cut, students unfold their square,  turn it over and glue it to their base paper.

Next they fit their shapes back into the spaces they were cut from -- like a puzzle.

Then, one at a time, they flip the puzzle pieces to the outside and glue.
We will be using gluestick to do this, but Mod Podge would work well, too.
A final piece, done with a black 4" square glued on white, looks like this.

Friday, January 28, 2011

Experiment with Composition Results

This week 5th graders finished their experiment with composition using a color/alphabet system that we patterned after a process similar (we think) to one used by artist, Steve Roden (see earlier post here). We did it in one 50 minute session, but it was a rush. I would split it into 2 sessions next time. This turned out to be one of those projects where EVERYONE was successful!!

This was the first step in this project. Kids created a bunch of small squares, mixing colors.


Sunday, January 23, 2011

Color Systems and Structures - Steve Roden


I recently discovered local Pasadena artist, Steve Roden when Christopher Knight of the L.A. Times reviewed the 20 year survey of his work at the Pasadena Armory Center for the Arts.  I took my mother with me to see the show just before it closed earlier this month.

I am not sure I fully understand how Roden plans his art, but from what I gather, he starts with a system or structure.  For example he might focus on the notes in a musical score or a line from a poem.  He then assigns a structure of colors, shapes, lines, sizes, etc. to that score or poetry and uses this predetermined structure has he makes decisions in his artmaking (I think!!) Roden also produces sound and film using a similar process. According to Knight, 46 year old Roden has been compared to Arthur Dove, Paul Klee and Alfred Jensen.  You can read more on the artist’s website and see many images of his paintings.  Steve Roden ‘s webpage: Steve Roden's webpage  Click on “images” when you get there.
Knight’s article is here: here
His paintings have a wonderful rhythm and repetition that kids can readily identify.

I’ve been thinking about an art lesson for 5th graders where they start with a structure, create their own compositions based on the structure and are able to articulate their thinking during and after the process.  Roden’s work, as well as our previous work on Dale Chihuly, gives insight into an artist’s way of planning his or her artwork.


For our project I am having the students use the color wheel with a letter of the alphabet assigned to each color.


Before starting to create on paper, students will have the opportunity to "play" with moving squares on the Smartboard and talk about balance and composition.
I started with “A” in red and proceeded in order around the wheel.  Students will have a choice of using the letters of their own name or our school's name. If I had more time with the class I would probably let them choose other words, too.

I think one of the fun parts of teaching art for me is getting to play around with the ideas first while I’m still in the planning stages.  It helps me anticipate what students will be thinking as they work and what the pitfalls might be.  I started by using the letters in my first name and the alphabet color wheel.  
The first letter in my name is "C", so my first square is yellow to match the  "C" on my color wheel, etc.

For each letter I painted (using watercolor) a square using the wheel as my guide.  My plan was to later cut the squares out and compose a collage focusing on balance.  However, as I worked, I didn’t like just the solid color squares, so after they had dried a bit I went back in and added touches of a neighboring color to each square (mixing each of these colors in the tray.)  

Having the class do this will accomplish two purposes: practice using the tip of the watercolor brush (not squashing down all the bristles) and thinking about how to mix tertiary colors. Each little square felt like a mini-painting that I got involved in.


When the squares dry a bit, I'll have the kids cut them out and lay them out with like colors together so they can think about how they create color balance in their work. 


In my practice work I tried arranging the squares first on black and then on a white board.


I opted for white so I could do something with color on the background.  We’ll be gluing with Mod Podge applied with a sponge brush, so that’s what I used.  As I worked I thought about the angle(s)  I wanted to use and color placement on the overall piece.  I also thought about possible overlapping.  I want students to consider all these factors as they create their composition.

A final step was to help create unity by using crayons to frame each square – I used 2 complementary colors and then a black marker to give it some punch.

On this sample I used crumpled paper to print on the background and added texture to the painted squares with oil pastels to increase the brightness of the watercolors.

There are so many options available with a project like this, including treating the background with color or texture before gluing if you have the time. I am anxious to see what the kids come up with!!

CA Standard - Create mixed media, 2 dimensional composition that reflects unity and harmony...

Thursday, January 20, 2011

Cupcake Drawing/Sketching Results

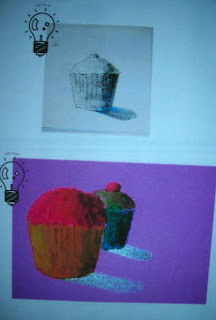
Our cupcake work is DONE!! Below are photos of a few kids at work on their pencil studies and the oil pastel drawings they did using their paper mache cupcakes as models.


 It didn't matter whether students were working with pencil or oil pastels, the majority of them had that "aha" moment when their flat drawing appeared to be 3 dimensional because of their shading. Kids were holding up each others' work and walking away so they could view the magic from a distance. I just LOVE it when that happens!! I have one more set of pencils sketches from this afternoon that I forgot to photograph. I'll add them later to this post, because that group REALLY got into it and most were able to sketch multiple cupcakes.


Saturday, January 15, 2011

Light Source with Cupcakes

This week 5th graders will be using the paper mache cupcakes they completed last week as models for pencil sketches and oil pastel drawings. We will be looking at shadows created when a light is directed at the cylinders and kids will have a paper light bulb icon to place on their paper to remind them where that light is coming from. I find that this helps them keep their shading and shadows consistent.
(Sorry the photo quality is a bit off on this!) 

Wednesday, January 12, 2011

Cupcake Results

We finished one batch of cupcake sculptures (a la Thiebaud) today and the rest should be done tomorrow. I thought we'd have time to use them as models for drawing today, but painting took the whole period. It seems I frequently misjudge how much kids can get done in 45 minutes!! We'll have to wait til next week for the drawings.

I love the way this boy planned out the placement of his purple and blue two-toned cupcake to alternate with the colors of his two-toned board. He was quite specific how he wanted everything placed!
 And these two students went all out on designing their boards with patterns:

My biggest surprise was when a couple of kids told me this was the first time they had ever done paper mache!!! I'm glad they got the opportunity before moving on to Middle School.

Wednesday, January 5, 2011

The Sketchbook Challenge

Well, I mailed off my sketchbook to Brooklyn for their Sketchbook Project. Glad it is on its way!

Now, I am on to something new -- the Sketchbook Challenge. It is SO MUCH FUN!!! Each month they post a topic (this month's is HIGHLY PRIZED) and you sketch one or more pieces that you can either post on your blog or in the Flickr Group collection. It was fun considering the topic and deciding what to draw/paint. I've only done one sketch so far and am not sure whether I'll submit more or not for this month. But, it's fun to think about!!

I like that it is not a weekly commitment and that there is plenty of time to complete the task. I also like getting back into a regular routine of using the sketchbook. When I signed on, I didn't anticipate the pleasure I'd get looking at all the variety of styles of the submissions of other participants. I think the whole challenge is a great idea!
If this sounds interesting to you, click on the badge at the bottom right of my blog to find out all the details.

Sunday, January 2, 2011

Cupcakes are Cylinders, Too

Are we all ready for a new year of ART??!!
Each grade level I have worked with this school year has started with studying light source and shading cylinders. 5th graders will be doing the same, only with a different project. We are starting the new year with a look at California artist, Wayne Thiebaud.

Wayne Thiebaud was born on Nov. 23, 1920 in Mesa, Arizona.  He moved to Long Beach, California with his family when he was a baby.

Thiebaud, which is pronounced “Tee-bo,” worked for more than 10 years in New York and Hollywood, CA as a cartoonist and a commercial artist in advertising. From 1942 to 1946 he served in the US Army Air Force. Then, using his GI bill, he went to college at San Jose State College and California State University at Sacramento. In 1951 he began teaching at Sacramento Junior college and after 8 years became an art professor at University of California at Davis, where he continued to work throughout his career. He is currently Professor Emeritus there.

Thiebaud is best known for his paintings of lines or arrays of foods found in diners or bakeries (like pies, cakes, etc.). As a young man, in Long Beach, he actually worked in a diner called Mile High and Red Hot. “Mile High” was ice cream and “Red Hot” was a hotdog. While he often painted groups of common objects, he also painted landscapes and figures.

Wayne Thiebaud is often associated with pop art, although he was painting his objects slightly before most of the well known pop artists had started their work. Thiebaud uses heavy pigment and strong colors in his work and his paintings almost always have well-defined shadows that are seen in advertisements. In 1994 he was presented the National Medal of Art by President Clinton.


After working on a Smartboard lesson below, where kids practice arranging 3 cupcakes using overlapping and decreasing size to create the illusion of space, fifth graders will make paper mache cupcakes that they can later use as a model for drawing. The largest cupcake is an infinite cloner. Students clone 2 more cupcakes, reducing their size, placing them “behind” the first cake and erasing unnecessary lines. We'll then talk about light source and shadows.

For the paper mache, students will start with a cupcake liner, a piece of newspaper and some masking tape.

Working with partners, they'll crumple the paper loosely to fit in the cupcake liner and tape crosswise (like a hot cross bun).

The next step is to paper mache the cupcake using newspaper strips and a mixture of flour and water. Given a larger budget, I'd use starch, and I know there are a lot more complicated mixtures that involve cooking, but I have used flour thinned with some warm water and have had great results.  I just start with about 1/4 cup of flour in a pie tin, add a bit more than 1/4 cup warm water and have the kids mix it with their fingers until it is smooth and a creamy consistency. This should be enough for 2 kids to share. Then, of course, they apply the soaked newspaper strips. One layer is enough for this project as long as it is smooth.

When the cupcakes are dry, kids will paint with acrylics.

My plan is to have the children work together to arrange their cupcakes in an array "installation" that they can sketch,  noticing shadows and using shading to give their drawing a 3-D look.  Then they'll decorate a small piece of thick matt board as a base and we'll glue gun the cupcake to it. Voila -- a cupcake sculpture to take home!! I'll post the results of the sculptures, the arrays and the drawings when they are done.