Wednesday, February 29, 2012

Kinetic Art

This week 2nd graders, inspired by the movement of Alexander Calder and the color systems of Steve Roden and F. Hundertwasser, are creating their own art with movable parts.

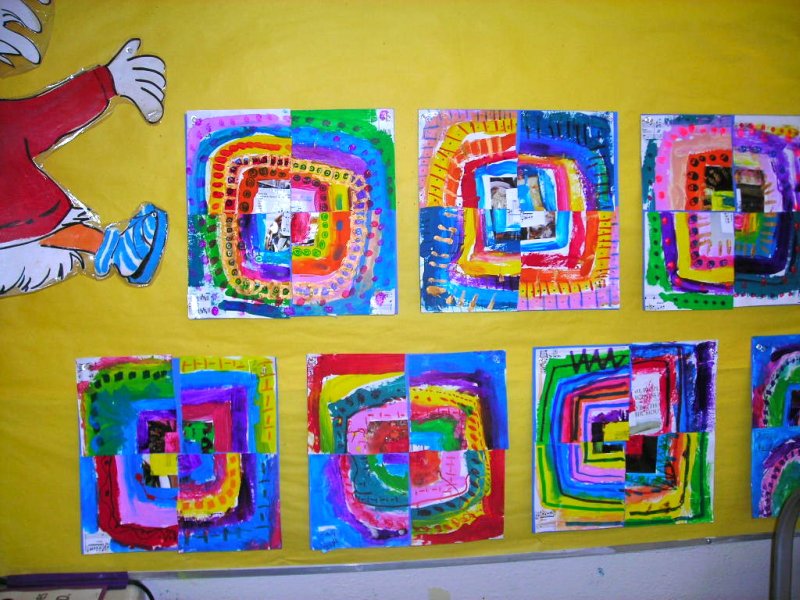
Starting with 2 rectangles of drawing paper and markers, students drew mini-concentric squares. They just finished a large concentric square project last week, so this was not a new concept.

The one rectangle was folded in half, creating 2 back-to-back squares and they cut the other rectangle in half to a draw on each of the squares. These single squares were eventually folded in half diagonally to create triangles. I asked the children to choose 2 or three colors next to each other on the color wheel for each square.

We bent and shaped 2 wires from which the folded shapes would hang. Balance and Motion is a science concept often studied in 1st or 2nd grade, so this project ties in nicely with other curriculum.


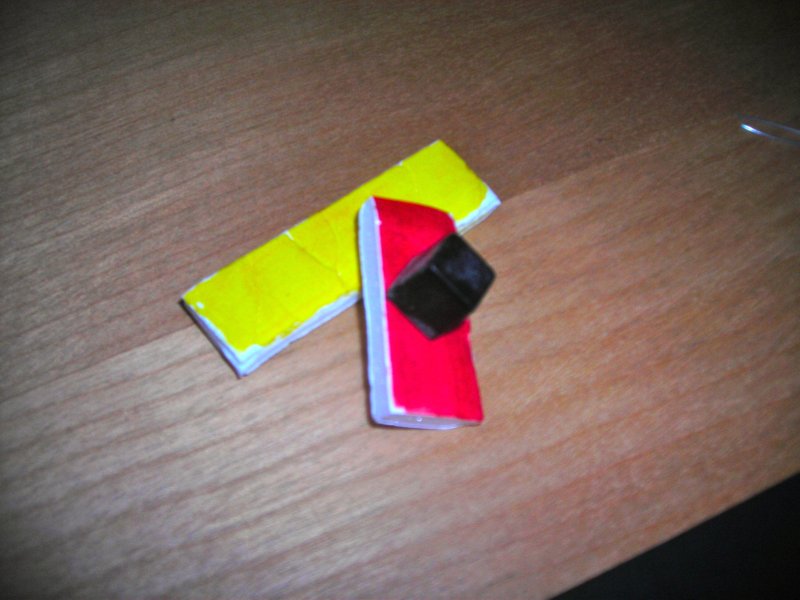
Students punched a hole in the smaller foam core using a push pin.


Once the small wire was pushed through the hole in the smaller, top foam core, kids spread the wires apart in back (like a brad fastener) and glued the 2 foam cores together, sandwiching the wire between the pieces of foam core.


The assemblage was attached to a 6" X 6" board using a small, bent wire and 2 small pieces if foam core. Students colored the 2 pieces of foam core repeating at least one color they had used for their concentric square drawings. They used a push pin to make a hole in the top (smaller) foam. Then they attached one of their larger wires to the small loop, which they used (much like a brad fastener) to insert through the top piece of foam core. We used Glue All to attach the foam core to the backing board.
Here are a few that are drying:

Thursday, February 23, 2012

2nd Grade Results - Squares and Macchia

2nd graders finished their Cooperative Concentric Square pieces this week. I posted the lesson here earlier in the month.
Having the small musical score squares in the four corners helped kids reconstruct the concentric squares when they cut them apart and reglued. I didn't originally have they do that for that reason , but turned out to be REALLY useful. I had just had the kids use them to reinforce the concept of "repetition."

This shows a student using a small piece of foam core board to "stamp" on paint details.

Some chose to use markers for details as well as (or instead of) paint.


Here are a few of their Chihuly inspired paper macchia, too. That lesson is posted here.
I have heard from parents that a LOT of kids went home and "educated" Mom and Dad about Dale Chihuly and his "hot shop"!!!

Sunday, February 19, 2012

Feb. 20, 2012

Hope everyone is having a great President's Day!! You may remember my blunderbust buddy, Max the Cat. Well, I'm Cassie, the dainty part of our dynamic duo. We spent the week-end with the whole family celebrating Auntie Christie's birthday. No Art for us (unless you count how we rearrange all the little things Grandma keeps on her tables). We just waited for the grown-ups to finish all that good food so they could play with us kittens. Enjoy this red, white and blue day!! (I know my colors -- maybe I'm almost ready for Art Class!??)

Thursday, February 16, 2012

This Week in the Art Room

Some 2nd graders finished their Chihuly-inspired paper macchia this week. I'm not sure which part of the process kids found most exciting -- watching the spray starch foam and move the color around the coffee filter (here) or unfolding the stiff, dried finished macchia all ready to glue to its base!!


Other classes painted the first part of their Concentric Squares (based on Frank Stella's Concentric Squares). Next week we cut them apart, share pieces with friends and make new pieces of cooperative art.
Here are a few on the drying rack.

Sunday, February 12, 2012

Happy Valentine's Day!

This morning I was reading Mary's bird post (HERE) and was intrigued with the negative space heart created by her 2 birds (so cute!!). That got me thinking of other things that might create a negative space hearts. These little cut-out men were what I came up with first.

That led to thinking about other heart things. I thought this idea with multiple hearts might work out, but I didn't much like them and was too impatient to try again with fatter markers:

Then I tried another version using the hand that we are seeing around the blogging world. I liked it better.
After doing this, I decided to grab my new camera and take a walk looking for Valentine things. I was surprised that I didn't find more along the street that I chose, but here are some nice wishes:


Hope everyone has a wonderful, fun-filled Valentine's Day. It is just about my favorite day to spend with 1st and 2nd graders, watching them read the cards they receive from friends!

Wednesday, February 8, 2012

Chihuly Inspired "Macchia"


A while back I saw a great Chihuly lesson posted on The Crayon Lab blog (here). I've seen quite a few Chihuly inspired art lessons on the web, but I liked the simplicity of using rubber bands to hold the coffee filters on paint bottles before spraying starch on them.

I pretty much followed the steps in that lesson, except I didn't have enough paint bottles, so we used plastic cups from Smart & Final (seems like I've been living there lately!).

I also showed the kids a slide show loop that is on Dale Chihuly's site ( here ), explaining that macchia means "spotted" in Italian. They also watched a short interview with the artist, in which he explains how he named the series (which he originally was referring to as "the uglies" because his mother thought they were ugly!! (interview is here)  I like the video clip on The Crayon Lab site, but it was a bit long, and showing YouTube at our school is a problem. With the help of another teacher, we managed to show half of that video to one of the classes.

Students thought about their color plan, putting lighter colors down first and making the spots on top of that layer of color. This actually follows the way the Chihuly team applies the colored spots (or jimmies) after the main part of the piece has been formed. We used regular Crayola watercolor markers and a coffee filter.
Next, students wrapped their coffee filter around a cup (they wrote their names and room #s inside the cup with permanent marker) and fastened it with a rubber band. This is a step where neighbors can help neighbors!
The last step for this first day is to spray starch the whole thing and let it dry. Kids LOVED watching the starch fizz and change their artwork.


The final step will be to glue the "macchia" to a piece of illustration board. We have pre-cut these donated boards to 6" X 6".

Sunday, February 5, 2012

Cooperative Squares


Last Spring I saw a great post on Pamela Holderman's site (here) about a cooperative project using circles. In her lesson the kids collaged and painted circles, cut their paintings into fourths and exchanged pieces to create a whole picture that they then layered with acetate and drew details on. Thanks, Pamela, for the motivation!!

I decided to change the circles to squares, omit the acetate, having the kids draw details right on their final piece, and make the main objective of the lesson REPETITION. So, this week we'll be doing the first steps:
     1. Students fold a 12" X 12" paper in fourths. (They know in advance that they will be sharing their painting with others.) I pre-cut some squares using a musical score for the kids to glue in the center (so they have a frame of reference for painting their squares in the next steps) and on each of the four corners (to reinforce the concept of repetition).

     2. Starting in the center, students paint and collage squares working from the center outward (being sure to repeat colors at least once):


     3. Week 2 we will cut each piece in fourths, using the fold lines on the back of the painting to follow, and exchange pieces so that each child has 1/4 of his/her own work and 3 pieces from classmates. Using sandwich picks and Glue All, kids will glue their 4 pieces onto another 12" X 12" piece of construction paper, using the sides to match.

If there is time, they will be able to add a few more details to their glued pieces.
I'll post the results as they become available.  Have a great week!